

Want to use OpenCode as an AI coding agent for building Roblox projects directly inside Roblox Studio? You can connect OpenCode to Roblox Studio through the Model Context Protocol (MCP) and let OpenCode interact with your Roblox Studio environment.
Roblox Studio provides an MCP server that can be connected to supported AI coding clients. While some clients can be connected through Roblox Studio’s built-in quick connection options, OpenCode requires a custom MCP configuration. In this guide, you’ll learn how to configure that connection on both Windows and macOS, verify that it works, and start using OpenCode to build Roblox projects.
What You’ll Learn
By the end of this tutorial, you’ll know how to:
- Set up a Roblox Studio project.
- Enable the Roblox Studio MCP server.
- Find OpenCode’s configuration directory.
- Create or edit the
opencode.jsonconfiguration file. - Configure the Roblox Studio MCP server on Windows.
- Configure the MCP connection on macOS.
- Restart OpenCode and verify the connection.
- Use OpenCode to work with your Roblox Studio project.
What Is MCP?
Model Context Protocol (MCP) is a standard that allows AI applications to connect to external tools and data sources.
In this setup, Roblox Studio acts as the environment that exposes an MCP server, while OpenCode acts as the AI coding client.
The basic architecture looks like this:
OpenCode → MCP → Roblox Studio
This means OpenCode can communicate with Roblox Studio through the MCP server instead of simply generating Roblox Lua code in isolation.
This is particularly useful when you want an AI coding agent to help you create, modify, or work with elements of a Roblox project.
Prerequisites
Before starting, make sure you have:
- Roblox Studio installed.
- OpenCode installed and working.
- Visual Studio Code or another text editor.
- A Roblox Studio project.
- Basic familiarity with JSON configuration files.
- An AI model/provider configured in OpenCode.
Step 1: Open Roblox Studio
First, launch Roblox Studio.
When Roblox Studio opens, you’ll see several project templates.
You can select any template for this tutorial. You can also open an existing Roblox project if you already have one.
For a simple test, select the Baseplate template.
Roblox Studio will load the project and display the standard development interface.
Once the project has loaded, keep Roblox Studio open because we’ll need it later when testing the MCP connection.
Step 2: Find the AI Coding Agents Options
Roblox Studio includes tools for connecting AI coding agents.
Look for the AI coding agents icon in the Studio interface and open it.
From here, you’ll find options for interacting with AI coding agents.
You may see a chat interface where AI agents can be used to assist with your Roblox development workflow.
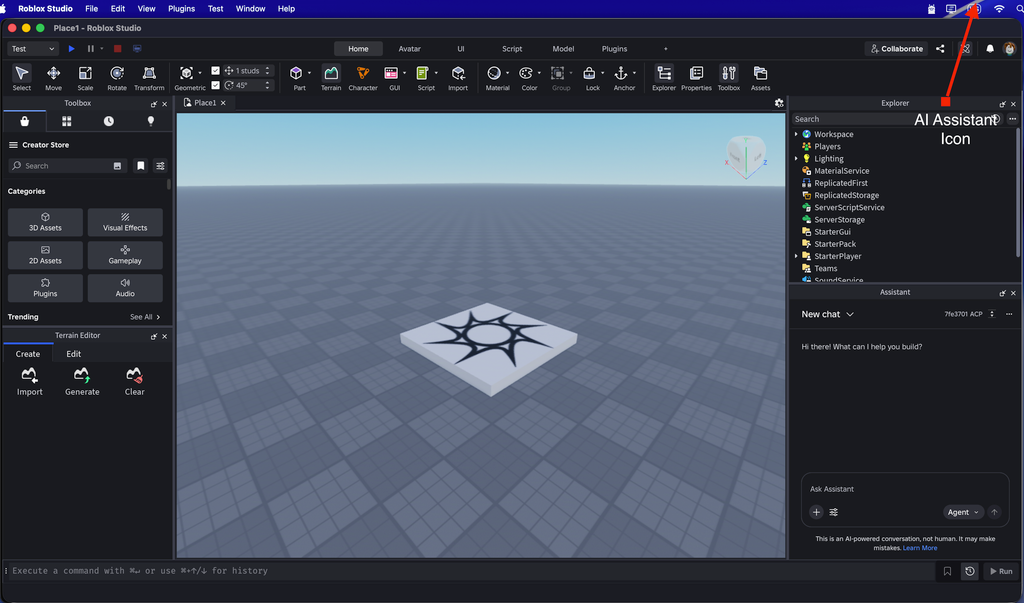
However, OpenCode isn’t necessarily available as a one-click option in the built-in client list.
That’s where the custom MCP configuration comes in.
Step 3: Open Manage MCP Servers
Inside the AI coding agents interface, open the three-dot menu.
Then select:
Manage MCP Servers
This is where Roblox Studio lets you configure and manage MCP connections.
Depending on your Roblox Studio version, you may see several supported clients and connection options.
For example, Roblox Studio can provide connection methods for clients such as Claude Code, Visual Studio Code, and other supported AI tools.
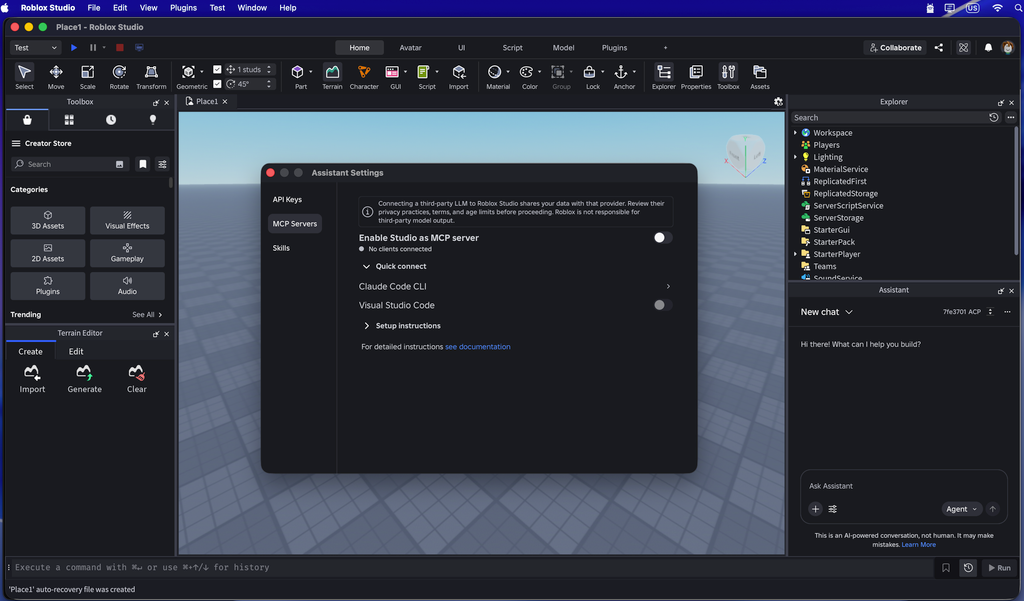
The important part is that OpenCode needs to be configured as a custom MCP client.
Step 4: Use the Custom MCP Configuration
Roblox provides documentation for connecting clients to its Studio MCP server.
The documentation includes a Quick Connections section for supported clients.
However, if your client isn’t listed, you can configure it manually using a JSON configuration.
That’s what we’ll do with OpenCode.
The important information we need from the Roblox Studio MCP configuration is:
- The MCP server type.
- The command used to start the MCP connection.
- The server’s enabled state.
- The appropriate OpenCode configuration structure.
The exact command or configuration can change as Roblox updates its MCP implementation, so it’s a good idea to compare your configuration with the current Roblox documentation when setting up a new installation.
Windows: Configure OpenCode for Roblox Studio MCP
Let’s start with Windows.
Step 5: Find the OpenCode Configuration Folder
Open File Explorer.
Navigate to your Windows user directory.
The general path is:
C:\Users\YOUR_USERNAME\
For example:
C:\Users\mdalmamun\
Inside your user directory, find:
.config
Then open:
.config\opencode
Your final directory should look similar to:
C:\Users\YOUR_USERNAME\.config\opencode\
If you don’t see the .config directory, make sure hidden files are visible in File Explorer.
Step 6: Find or Create opencode.json
Inside the OpenCode configuration directory, look for:
opencode.json
If the file already exists, you can edit it. Let me show you how to create the file in vs code
Step 7: Open the Configuration in Visual Studio Code
You can open the configuration directory in Visual Studio Code.
From the OpenCode directory, open a terminal and run:
code .
Alternatively, you can open Visual Studio Code normally and open the .config/opencode folder.
Then open:
opencode.json
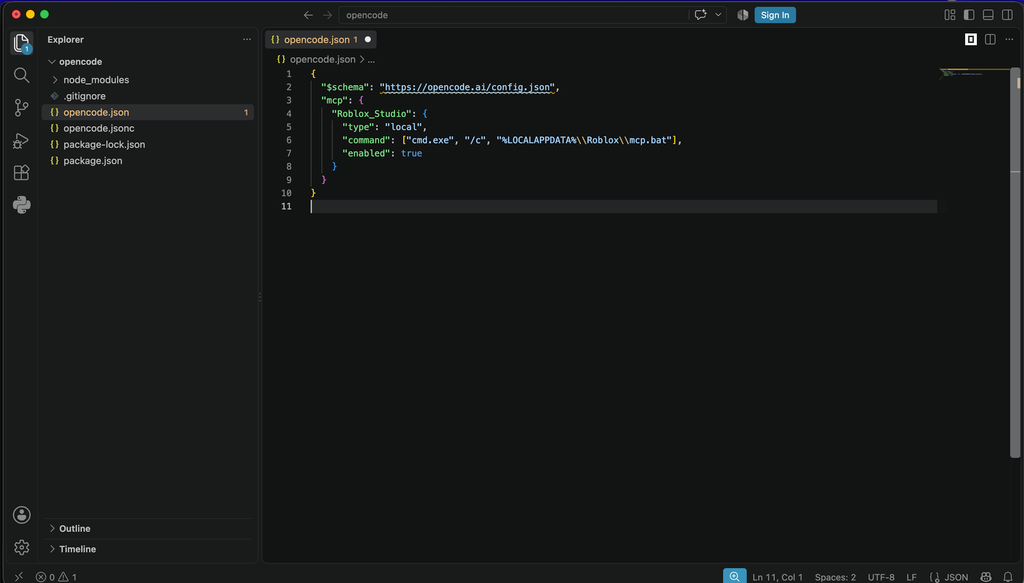
Step 8: Add the Roblox Studio MCP Configuration on Windows
Your OpenCode configuration needs an MCP section that points to the Roblox Studio MCP server.
A typical structure looks like this:
{
  "$schema": "https://opencode.ai/config.json",
  "mcp": {
    "Roblox_Studio": {
      "type": "local",
      "command": ["cmd.exe", "/c", "%LOCALAPPDATA%\\Roblox\\mcp.bat"],
      "enabled": true
    }
  }
}
Understanding the Configuration
Let’s break this down.
The first property specifies the OpenCode configuration schema:
"$schema": "https://opencode.ai/config.json"
This helps editors such as Visual Studio Code understand the structure of your OpenCode configuration.
Next is:
"mcp": {}
This tells OpenCode that you’re defining MCP servers.
Inside it, we create a server entry:
"roblox-studio": {}
The name is simply an identifier for the Roblox Studio connection.
Next:
"type": "local"
This tells OpenCode that the MCP server is a locally running process.
Then:
"command": [
  "YOUR_ROBLOX_MCP_COMMAND"
]
This specifies the command OpenCode should use to launch or communicate with the MCP server.
Finally:
"enabled": true
ensures that the MCP server is enabled.
Important: Use the exact Roblox Studio MCP command provided by the current Roblox documentation rather than copying an outdated command from an older tutorial.
Step 9: Save the Configuration
After adding the configuration, save the file.
On Windows, press:
Ctrl + S
Make sure the JSON is valid before closing Visual Studio Code.
A missing comma, quotation mark, or bracket can prevent OpenCode from loading the configuration.
macOS: Configure OpenCode for Roblox Studio MCP
Now let’s configure the same connection on macOS.
Step 10: Open the OpenCode Configuration Directory
On your Mac, open Finder.
Navigate to your home directory.
The OpenCode configuration is generally located under:
~/.config/opencode/
Because .config is a hidden directory, you may not immediately see it.
Step 11: Show Hidden Files on macOS
To show hidden files in Finder, press:
Shift + Command + .
This keyboard shortcut toggles hidden files.
You should now be able to see directories beginning with a dot, including:
.config
Open:
.config
Then open:
opencode
Your directory should look like:
~/.config/opencode/
Step 12: Open the Folder in Visual Studio Code
Open Visual Studio Code.
You can either use:
File → Open Folder
or drag the OpenCode configuration folder into Visual Studio Code.
You should see the OpenCode configuration files.
If opencode.json doesn’t exist, create a new file with exactly this name:
opencode.json
Step 13: Add the MCP Configuration on Mac/Linux
Add your Roblox Studio MCP configuration to opencode.json.
For example:
{
  "$schema": "https://opencode.ai/config.json",
  "mcp": {
    "Roblox_Studio": {
      "type": "local",
      "command": ["/Applications/RobloxStudio.app/Contents/MacOS/StudioMCP"],
      "enabled": true
    }
  }
}
Again, replace the placeholder command with the current MCP command supplied by Roblox.
Save the file with:
Command + S
Step 14: Enable the MCP Server in Roblox Studio
Now return to Roblox Studio.
Open the AI coding agents interface.
Then click the:
Three-dot menu → Manage MCP Servers
Find the Studio MCP server and enable it.
Once enabled, Roblox Studio should indicate that an MCP client has connected.
You may see an indicator similar to:
1 client connected
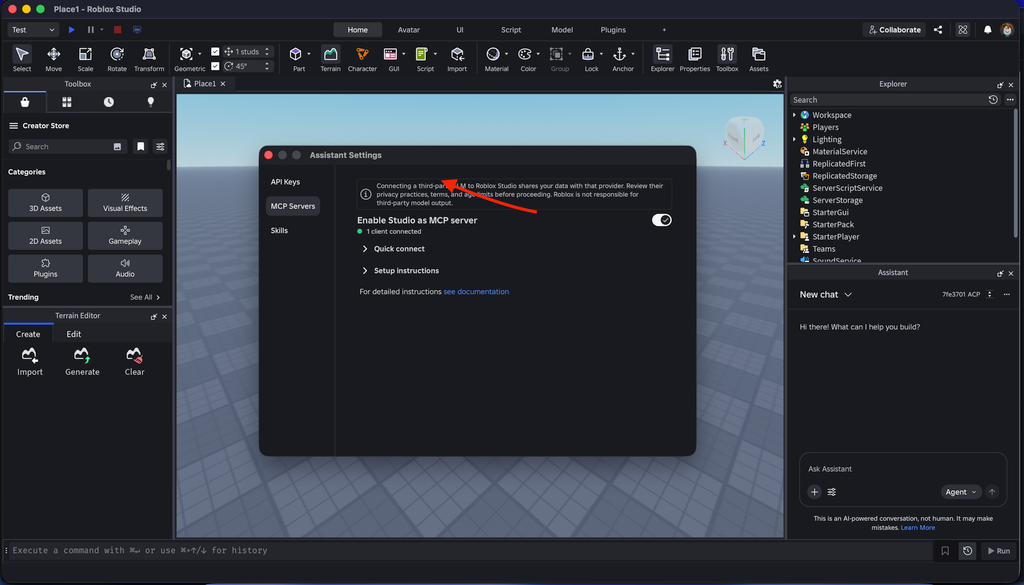
This is an important sign that the MCP server is active.
Step 15: Restart OpenCode
After changing the opencode.json configuration, completely close OpenCode.
Then start OpenCode again.
Restarting OpenCode is important because the application needs to reload the MCP configuration.
If you leave an existing OpenCode session running, it may not immediately recognize the new server configuration.
Step 16: Verify the MCP Connection
Once OpenCode has restarted, you can verify the MCP connection.
Open the OpenCode terminal/interface and run:
/mcp
Press Enter.
OpenCode should display information about the configured MCP servers.
Look for the Roblox Studio MCP server.
You should see that the Roblox connection is available or connected.
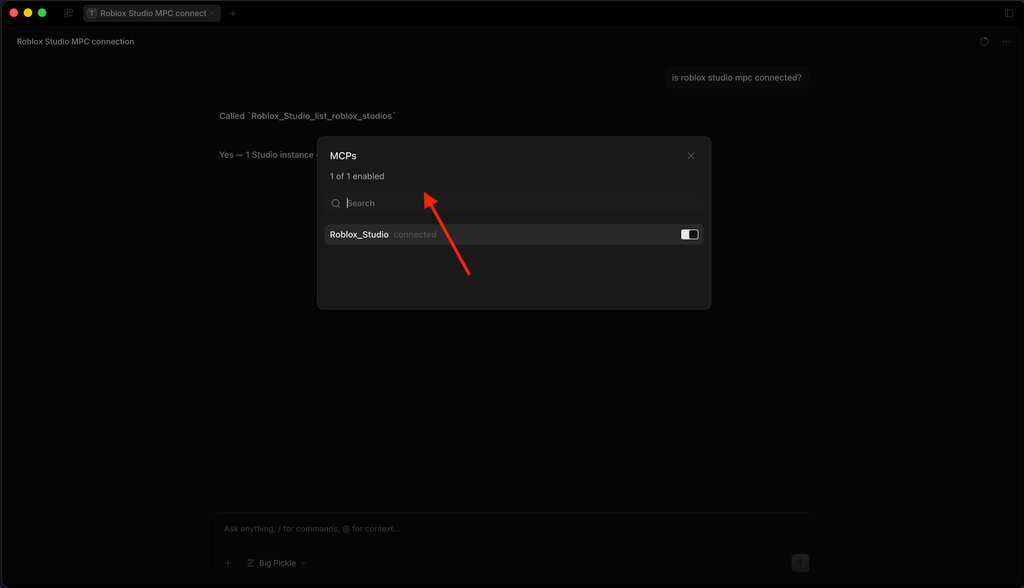
You can also ask OpenCode a direct question such as:
Is Roblox Studio MCP connected?
If everything is configured correctly, OpenCode should be able to identify the Roblox Studio MCP connection.
Step 17: Start Building Your Roblox Project with OpenCode
Once the MCP connection is working, you can start using OpenCode alongside Roblox Studio.
For example, you can ask OpenCode to help you build Roblox functionality such as:
- Player movement systems
- Game mechanics
- UI interfaces
- Leaderboards
- Inventory systems
- NPC behavior
- Obby mechanics
- Teleportation systems
- Data storage logic
- Lua scripts
- Game initialization logic
Instead of repeatedly switching between your AI assistant and Roblox Studio, MCP provides a bridge between the AI coding agent and the development environment.
The exact capabilities available depend on the Roblox Studio MCP implementation and the tools it exposes.
Step 18: Choose an AI Model in OpenCode
The MCP connection is separate from the AI model you choose.
OpenCode can work with different model providers depending on your configuration.
For example, you may configure providers such as:
- OpenCode’s available models
- Anthropic Claude
- Google Gemini
- OpenRouter
- Other supported providers
This gives you flexibility when choosing the model you want to use for your Roblox development workflow.
For example, if you already have an OpenRouter configuration, you may be able to use an OpenRouter-supported model while OpenCode communicates with Roblox Studio through MCP.
The important distinction is:
AI model → OpenCode → MCP → Roblox Studio
The model generates the reasoning and code, OpenCode acts as the coding agent, and MCP provides the connection to Roblox Studio.
Troubleshooting OpenCode + Roblox Studio MCP
If the connection isn’t working, check these common issues.
1. OpenCode Doesn’t Detect the MCP Server
First, make sure you completely restarted OpenCode after modifying opencode.json.
Then run:
/mcp
If the server isn’t listed, verify that the configuration file is in the correct directory.
On Windows:
C:\Users\YOUR_USERNAME\.config\opencode\
On macOS:
~/.config/opencode/
2. Check Your JSON Syntax
A single syntax error can prevent OpenCode from loading the configuration.
For example, this is invalid:
{
  "mcp": {
    "roblox-studio": {
      "type": "local"
      "enabled": true
    }
  }
}
There is a missing comma after:
"type": "local"
The corrected version is:
{
  "mcp": {
    "roblox-studio": {
      "type": "local",
      "enabled": true
    }
  }
}
Using Visual Studio Code is helpful because it can highlight JSON syntax errors.
3. Roblox Studio MCP Isn’t Enabled
Go back to:
AI Coding Agents → Three-dot menu → Manage MCP Servers
Make sure the Studio MCP server is enabled.
If the server isn’t running, OpenCode won’t be able to establish the connection.
4. The MCP Command Has Changed
MCP integrations can change as applications receive updates.
If an older configuration doesn’t work, check the current Roblox Studio MCP documentation and compare the command and configuration requirements with your local setup.
Don’t assume that a configuration copied from an older tutorial will always work with the newest version of Roblox Studio or OpenCode.
Why Connect OpenCode to Roblox Studio?
Using OpenCode with Roblox Studio can make AI-assisted game development much more practical.
Instead of treating the AI as a separate chatbot that only generates snippets, you can connect the AI coding agent to your development environment.
This can help reduce repetitive copy-and-paste work and make it easier to iterate on Roblox projects.
For developers who are already comfortable with AI coding agents, MCP also introduces a more general workflow: the AI agent can interact with external development tools through standardized interfaces.
That makes this setup useful beyond Roblox as well.
Frequently Asked Questions
Can I use OpenCode with Roblox Studio?
Yes. OpenCode can be connected to Roblox Studio through the Studio MCP server using a custom MCP configuration.
Do I need Claude to use Roblox Studio MCP with OpenCode?
No. OpenCode and the MCP connection are separate from the model provider. You can use any AI model/provider supported by your OpenCode setup.
Where is the OpenCode configuration file on Windows?
The configuration is generally located under:
C:\Users\YOUR_USERNAME\.config\opencode\
The main configuration file is:
opencode.json
Where is the configuration file on macOS?
On macOS, the configuration is generally located at:
~/.config/opencode/opencode.json
Remember that .config is a hidden directory in Finder.
How can I check whether MCP is connected?
Restart OpenCode and run:
/mcp
Then look for the Roblox Studio MCP server and its connection status.
Conclusion
Connecting OpenCode to Roblox Studio with MCP gives you a powerful workflow for AI-assisted Roblox development.
The process is straightforward:
- Open Roblox Studio and create or open a project.
- Open Manage MCP Servers.
- Enable the Roblox Studio MCP server.
- Find your OpenCode configuration directory.
- Create or edit
opencode.json. - Add the Roblox Studio MCP configuration.
- Save the configuration.
- Restart OpenCode.
- Run
/mcpto verify the connection. - Start building your Roblox project with OpenCode.
The key idea is that MCP acts as the bridge between OpenCode and Roblox Studio. Once that bridge is working, you can combine OpenCode’s AI coding capabilities with your Roblox development environment.
If you’re following along with the video, make sure to check the video for the complete setup demonstration and the exact configuration used in the tutorial.
Have you tried using OpenCode with Roblox Studio? Let me know in the comments what type of Roblox game you’re building.
